[fusion_dropcap color=”” boxed=”yes” boxed_radius=”50%” class=”” id=””]H[/fusion_dropcap]eirloom tomatoes can’t be beaten for their outstanding flavor and beauty, so when purchasing seedlings, skip the Home Depot hybrid-factory and support organic growers and your local nursery. Check out tomatomania.com to see where their spectacular heirloom tomato sale is pitching its next tent, or if you’re in Los Angeles, contact Nysha at ardenwoodsedibles.com. She always has unusual all-organic heirloom varieties.
Tip # 1) Plan what to grow – Variety is the spice of life, so I like to grow several varieties of tomatoes for flavor, size and function. It also gives me a longer harvest period so I don’t have to bushwhack my friends and family into canning duty when my tomatoes all ripen at once. I’ve created five categories to help you decide what and how much of each you want to grow.
THE EARLY RISERS – Early tomatoes are great if you live in a short season growing zone, or even better if you live in a warmer climate because you can plant in April and get your goodies by June. All these ‘short season’ varieties mature in 50-65 days depending on the weather. My favorite varieties include Stupice(love this), Matina, Anna Russian, Bloody Butcher and the excellent Cuore de Toro (Bulls Heart).

Texas Grapefruit Tomato
THE BIG PRODUCERS – Everybody likes a workhorse in the vegetable garden, and I call these varieties the ‘Jerry Bruckheimers’ because they are simply huge producers. Thankfully, that’s where the comparison ends as all thesevarieties have impeccable taste and you’ll never get tired of their endless re-runs throughout the season. They are all indeterminatesmeaning they continue producing after the first crop. My favorite ‘episodes’ include – Arkansas Traveler, Brandywine, Black Krim, Texas Grapefruit, Jaune Flamme and Radiator Charlie’s Mortgage Lifter( I grew this one for the name alone) .
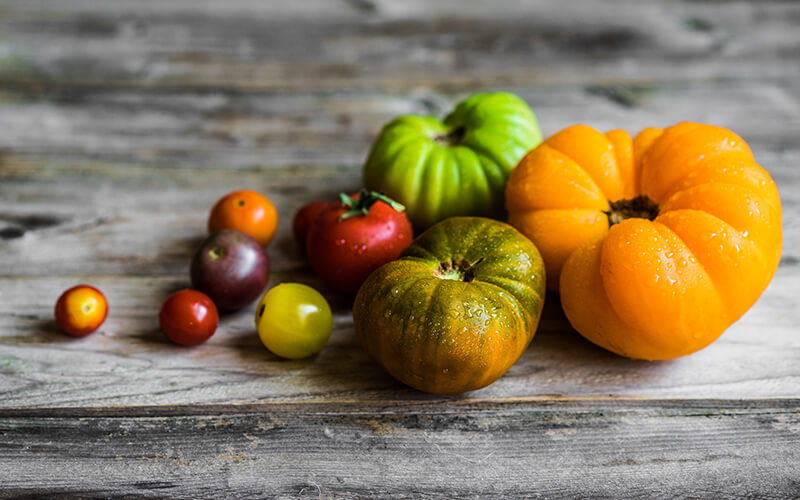
THE ‘MISS AMERICA’S’ – I always try to plant a few beautiful and unusual heirlooms that I’ve never grown before. Just like beauty queens, Heirloom tomatoes come in all shapes, sizes and colors. There’s no end to the weird and wonderful heirloom gems out there. This year I planted Michael Pollan and Haley’s Purple Comet. Past pageant winners in my garden include Dakota, Black Zebra, Mr. Stripey, Purple Calabash, Old German, Orange Oxheart, Chocolate Stripe and Zapotec Pink Ribbed.
GOOD FOR COOKS – Paste tomatoes generally have more flesh than water which makes them great for cooking. The best ones are usually Roma tomatoes which tend to be determinate,meaning you get only one crop from each plant. Amish paste, Big Italian Plum, San Marzano, La Roma and Mama Leone are all great heirloom varieties. A good tip for making sauce is to mix in some paste tomatoes with other non paste varieties. You’ll get big, rich flavors this way.
THE ‘DURACELL BUNNIES’ – What I love about Cherry tomatoes is that they just keep on going. By the time fall comes round and your 25 Mason jars are safely tucked away in the sauce cellar, these sweet, relentless little producers will still be on hand for Autumn salads and school lunch boxes. Cherry Tomatoes tend to grow more like bushes than vines so plant them in a space where they can sprawl out as they grow. My favorite non-stop drummers include: Black Cherry, Tumbling Tom, Black Plum, Coyote, and Isis candy.
Tip # 2) LOCATION. LOCATION. LOCATION. Tomatoes need sun and lots of it. Plan to grow tomatoes in an area that gets at least 6-8 hours sun (aka full sun). If you can, choose a site that gets the most morning sun – it will help evaporate excess dew and moisture from the leaves – a great way to prevent mold and disease problems before they start.
Tip # 3) SOIL IS EVERYTHING. Don’t plant your seedlings without amending your soil. Tomatoes are big feeders and attention to your soil will pay you back in spades. If you don’t have your own compost, pick up some good organic soil amendment at your local nursery (many big box store amendments contain nasties like sewage sludge). Add to this some egg shells(calcium) and fish emulsion (diluted to 1 tbl spoon per gallon). Some people swear by placing fish heads in the planting hole, but I find it can attract digging animals. I also like to use an organic starter fertilizer like Sure Start from EB Stone. It will give your plant a great kick start to bed down and start rooting faster. The mix contains Mycorrhiza which is actually a beneficial fungus which not only facilitates growth but protects your tomatoes from pathogenic wilting diseases such as verticillium and fusarium wilts.
Tip # 4) CHOOSE HEALTHY SEEDLINGS
If you haven’t started your own seedlings by May, it’s probably too late. So go to your local nursery or organic grower and pick out sturdy seedlings with deep green, perky leaves. Don’t worry about the size of the plant so much as the condition. Larger plants with fruit and flowers on them have probably been in those little containers too long, so sometimes it’s better to get the small ones that look robust and ready to run.
Tip # 5) BURY THEM UP TO THEIR NECKS –
Those little hairs on the base of the main stem are roots. Cut the bottom two leaf shoots off your seedlings and plant it right up to the next set of leaves. Tomatoes like to root deep so don’t be afraid you are suffocating the plant, it will thank you for it later.
Tip # 6) WATER WISELY –
Watering practices will hugely determine the quality of your crop. When planting your seedlings, water heavily so that the root zone is saturated. After that, water evenly to keep the moisture content consistent. Don’t let the plants dry out then saturate them. I water my seedlings deeply about once a week then check in with them depending on the weather. A good rule of thumb is 1 to 1 ½ inches of water a week until the fruit sets. Don’t let the soil go dry before re-watering or you will be vulnerable to blossom end rot or a blighted plant! Warm windy weather will dry the plants out faster than hot humid weather and if there’s a heatwave, all bets are off. Keep an eye on the plants in hot weather. If the leaves start to wilt, give them a drink. If you get a lot of rain on the other hand, just let nature do its job. It’s also important to remember not to water the leaves or you will expose them to mold. When the plant sets fruit and it gets closer to maturity, water a lot less frequently but deeply. Lots of water will give you big tasteless fruit because the water goes straight to the fruit.
Tip # 7) MULCH LATER– Wait for a couple of weeks of growth, then mulch heavily above the root zone. Make sure you mulch after the ground has had a chance to warm up. If you put it down too early it will also shade and therefore cool the soil. Mulching will help conserve water and prevent soil born diseases from splashing up on the plants, and will keep the root zone cool in the hot summer weather.
Tip #8) GET A GOOD CAGE – Tomatoes get big, so don’t buy one of those scrawny little coat-hanger cages. Make sure it’s at least 4ft high and 18″ in diameter. It is virtually impossible to cage a plant once it has grown over 2ft (because the stems break very easily), so install your cage when you plant your seedling. On another note, Tomatoes are nay impossible to transplant once they have started rooting. So plant them where you intend them to blossom. As your plants grow, trim and snip – Trimming your plants lets more sunlight in, giving you bigger healthier vines and fruits. You can make your own cages easily. Watch the fabulous Julie Chai from Sunset Magazine make one here.
Tip # 9) DON’T GO NUTS WITH THE FERTILIZER. Don’t use synthetic fertilizers like Miracle Grow on your tomatoes. Besides having the potential to burn your plants, synthetic fertilizers are too heavily nitrogen-based and while you might get big green foliage, your plants will bear very little fruit. Organic fertilizers like EB Stone Tomato and Vegetable Food is non burning and should be applied 4-6 weeks after planting. Work some fertilizer into the top 2″ of soil around the root zone and water it down. Once during the season is enough.
Tip # 10) MARK YOUR PLANTS AND SAVE YOUR SEEDS. It’s a great idea to mark your plants when you first plant them. But don’t put the plant marker down in the ground beside the stem. Why? Because when you have that huge tomato plant producing bushels of tomatoes, you wont be able to reach under the cage to tell what it is and the water will probably have washed the name off anyway. I like to punch a hole in the plant marker and tie it to the cage when I lay down the seedling. That way you can identify each plant easily. It’s nice to remember their names when the neighbors are wowing your darlings. Save some seeds from each variety you grow. It’s easy to do and a great way to share and swap with other growers. It preserves biodiversity and it’s how our forefathers gave us these great heirlooms in the first place.
Happy Planting – Conor